There are two methods of installing our building letters and numbers.
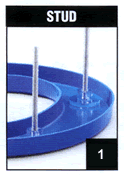
Method 1 - Stud Mounting (Used for plastic or metal building letters)

1. Level and tape the mounting template to the installation surface.
2. Drill 3" deep holes where indicated on your template and clean out the holes by blowing air into the holes.
3. Insert the studs into the stud holes on the back of each letter.
4. Dry fit the letter in the holes on the wall and make any necessary adjustments.
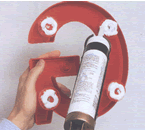
5. Fill the holes in the wall with silicone adhesive and push the tube of silicone over each stud on the back of the letter to evenly coat them.
6. Push the letter into the holes on the wall and clean up any excess silicone.
7. Repeat these steps for each letter.
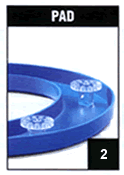
Method 2 - Pad Mounting (Used for plastic letters only)
1. Level and tape the spacing tape on the installation surface.
2. Apply silicone to all of the pads on the first letter.
3. Position the letter on the wall where indicated on the spacing tape.
4. Tape the letter to the wall with several strips of masking tape.
5. Adjust the letters as needed and push them firmly against the wall to insure a good bond.
6. Continue with the remainder of the letters and allow the silicone to cure overnight before removing the tape.